Rock-bottom price aside, the Nexus 4 is an excellent smartphone. You just have to like Android without any of the sometimes-useful extras that you get with the competition’s software overlays. The Nexus 4 is LG’s triumphant return to the mobile race with a sober, elegant and effective smartphone. The only major issues that could turn off certain consumers are the inconsistent camera rendering and non-expandable memory. That said, you won’t find better value for your money anywhere else in the Android universe. The full tutorial will tell you how to convert and transfer Christmas 1080p Blu-ray DVD movies to the new Google/LG Nexus 4 for watching.
The LG-built Google Nexus 4 has up-market specs at a competitive SIM-free price: £239 for the 8 GB version and £279 and for the 16 GB. Necessarily, at rates like these the phone is creating buzz and high expectations. It has a 4.7″ IPS Plus screen (LG’s own Zerogap technology) with 1280 x 768 resolution, a 1.5 GHz Krait Qualcomm Snapdragon S4 Pro quad-core processor, 2 GB of RAM, a backlit 8-Megapixel camera sensor and a 2,100 mAh battery.
So, will the Nexus 4 make a good Christmas present?
Pros
- Design and finish
- IPS display with high contrast and brightness
- Good resolution and legibility
- Responsive
- Latest version of Android (4.2 Jelly Bean)
- Gesture Typing keyboard
Cons
- Non-expandable memory
- No 4G
- Location of the speaker
- Mediocre camera sensor
- Photo Sphere impractical to use
Best Video Formats Supported by Google/LG Nexus 4:
Video Format: MP4, H.264, H.263
Video Resolution: 1280 x 768 pixels
Audio Format: MP3, WAV, eAAC+, AC3
And here is a problem — how to watch your Christmas Blu-ray movies with Google Nexus 4? You will find that as a portable device, Nexus 4 can’t playback Blu-ray/DVD disc directly. Now, you just need a Blu-ray Ripper for Nexus 4. This tool can help you to convert your huge DVD’s and Blu-Ray collection of movies to Nexus 4 compatible video format on Windows or Mac. I’ve found the quality to be excellent, and see no difference when compared to playing the discs themselves. The audio/video synchronization is very good, the size of the subtitles too. The time it takes to convert in this software is almost half that in other. If you using a Mac, you can get the Nexus 4 Blu-ray Ripper for Mac to transfer your Blu-ray/DVD movies to Nexus 4 on Mac OS X (Mavericks and Mountain Lion included). Now just free download it and follow the tutorial below. It’s very easy.
How to Convert Blu-ray to Nexus 4 compatible video formats
Note: This guide uses Pavtube BDMagic for Windows(Windows 8 compatible) screenshots. And a BD drive is needed for ripping Blu-ray discs. The way encoding Blu-ray to Nexus 4 on mac is the same.
Step 1. Add Blu-ray movies you want to rip to the program
Open the top Blu-ray to Nexus 4 Converter, insert the Blu-ray disc to your BD drive, and then click the “Blu-ray disc” button on the interface to navigate to the videos you want to convert. You can also add Blu-ray or DVD ISO file, IFO file or DVD folder.
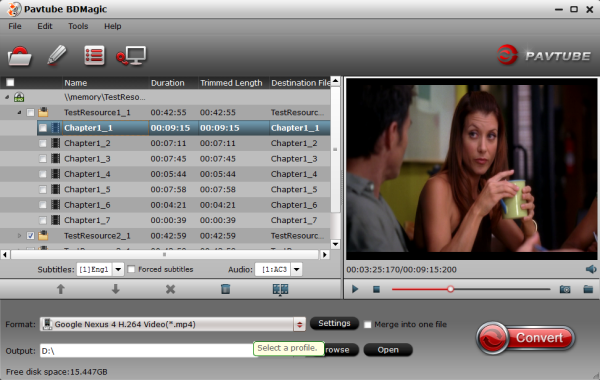
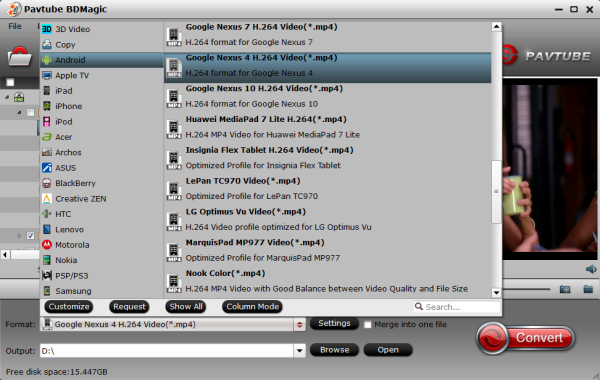
Step 2. Choose MP4 as the output video format
Click “Format” bar, you can easily find the optimized videos for the Nexus 4 under “Android > Google Nexus 4 H.264 Video(*.mp4)”. The output videos could fit on your device perfectly.
Tip:
Profile Settings – If you like, you can click “Settings” to change the video encoder, resolution, frame rate, etc. as you wish. For watching videos on the Android 4.2 os phone, 720p with 1500kbps is just all right. I found the file size and video quality is based more on bitrate than resolution which means bitrate higher results in big file size, and lower visible quality loss, and vice versa. After several conversions and tests I worked out the best settings for ripping Blu-ray to Nexus 4 as follows:
Step 3. Convert 1080p Blu-ray movies to Google Nexus 4
And the last step is starting Blu-ray movies conversion. After those previous settings, now click “Convert” button to start converting Blu-ray/DVD movie to MP4 for Nexus 4 transferring. It will not take much time. Just wait for the conversion process to get done.
Tips: Before the conversion, you can click “Edit” button edit your videos by cropping, trimming, adding watermarks, etc. What’s more, you can choose the subtitles and audio track for the target video on the main interface.
After the conversion, just transfer the converted video files to your your Nexus 4 via USB cable.
How to Connect Galaxy Nexus 4 to PC via USB
Windows:
1. Use a USB cable to connect your Galaxy Nexus to a Windows computer.
2. This connection uses the MTP protocol, which is supported by most recent versions of Windows.
3. When you connect your Galaxy Nexus to the USB port on your Windows computer, its USB storage is mounted as a drive and appears on your computer screen.
4. Now you can copy music, picture, video files to Galaxy Nexus from windows PC as you using any other external device.
5. When you’re finished, simply disconnect the Galaxy Nexus by unplugging the USB cable.
Note: If you are using USB tethering, you must turn that off before you can use USB to transfer files between your Galaxy Nexus phone and Windows computer.
Mac:
This connection uses the MTP protocol, which is not supported by Mac OS X natively. Therefore, you first need to install the free Android File Transfer application on your Macintosh. It’s available from www.android.com/filetransfer, along with instructions on how to install it. After you install Android File Transfer, follow these steps:
1. If you are using Android File Transfer for the first time, double-click it to open it.
2. After you start Android File Transfer once, it opens automatically whenever you connect your device to your computer.
3. Connect your device to your computer with a USB cable.
4. Android File Transfer starts, if it’s not already running, and opens a window that displays the contents of your device, along with storage space details at the bottom of the window.
5. If it were a Finder window: opening and closing folders, creating new folders, and dragging music, picture, video files to Galaxy Nexus from Mac PC. Disconnect the USB cable when you’re finished.
Above are the instruction on how to connect Galaxy Nexus to PC(Mac and Windows) for transferring music, picture, video files.
Now, you can enjoy Blu-ray movies on Nexus 4 freely.
More topics: