Overview | Guide | Tech Spec | Review
With Pavtube iMedia Converter for Mac, you can easily convert DVDs, Blu-rays, video and audio to an optimum format for your computer and mobile devices.
Step 1: Import Video, Audio or Blu-ray, DVD Files
Double click the program icon to start iMedia Converter for Mac.
Use the following methods to import files to the program:
- Drag video, audio files to the program window. If a folder is added, all the files contained in the folder will be added to the program.
- Browse or search videos or Blu-ray, DVDs in Media Browser which will show up by clicking the button at the top right corner, and drag it to the program.
A list of imported files appears in the primary window, as shown below.

Note: By default, it only checks main features of the DVD and Blu-ray movie for conversion, without DVD menu and the movie just starts playing right away.
Step 2: Select Your Output Format
More than 80 output formats are supported. You can even create your own presets. To choose an output format, simply click the format icon from the list. All formats are grouped into 6 categories. Find your desired output format by going to the right category.

By choosing an audio format, you extract only the audio track from the video, or convert audio files from one format to another.
Step 3: Start conversion on Mac
You can change the output folder by selecting the Output option at bottom. Otherwise, the default folder will be used. After the settings are completed, simply click the "Convert" button and the program will complete that tasks soon. You’ll see the status changed right on the item bar. When done, you’ll receive a prompt message and choose whether to open the output folder.
Edit and Personalize Your Video
Pavtube iMedia Converter for Mac provides you with all regular video editing tools so you can enhance your video before conversion.
Open Video Editing Window
Click the Edit pen icon of the video item bar and a video editing window will show up as below. Thus you can rotate, trim, crop your video and add effects, watermark and subtitle with ease. You can also directly go the specific tab by the Edit menu on top.

Diverse Video Editing Tools
Trim Video: Go to Edit > Trimming to open the editing windows. Click the Play button to preview your video and at the position you want to trim, click the Add trim marker button to show up markers on the progress bar. Drag the markers to adjust segment duration. Repeat this process to add more segments.
By default, all segments will be joined together without gaps if the Preference option is set to Keep the selected section. By changing the Preference option to Deleted the selected section, the program will join un-selected parts.
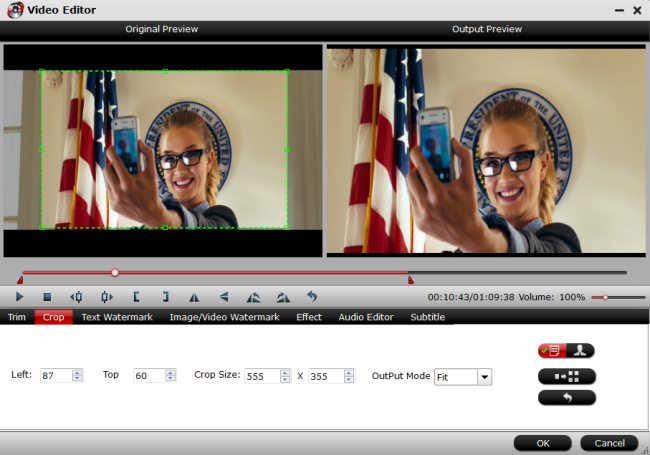
Crop Video: In the Adjust tab, click the Crop button to show up the crop buttons on the preview window. Adjust handles to resize the crop area. Click Done to save settings. You can use the Aspect Ratio option to crop video in desired aspect ration conveniently.
Rotate Video: As you can see in the above window, there are 4 rotating buttons in a row. Click each to rotate or flip video instantly.
Apply Effects: Go to Effect tab to choose from 14 effect to tune up your video. Simply click an effect to apply. You can even apply a favorite effect to all imported videos. 4 video parameters are also provided so you can adjust video effects yourself. They are Volume, Brightness, Contrast and Saturation.
Add Watermark/Subtitle: You can add watermark or subtitle in the Watermark tab or Subtitle tab, respectively. In the Watermark tab, choose what type of watermark you want, and then input text or load local image. You can adjust the watermark transparency to suit your needs. In the Subtitle tab, you can load an external subtitle file like. ssa,. ass,. srt to put on the video. This is very useful for deaf people or for watching foreign movies. If you don’t have a subtitle file, go to opensubtitles.org to download one for free.

Take Snapshot: While you’re previewing a video, you can take a snapshot to JPG image by clicking the Snapshot button under the preview window.