How do you transfer Media contents(Music, Photos, Video, TV Shows) to your Samsung Galaxy Phones and Tablets? If you have no idea, here are 4 ways for you to transfer music and video to Galaxy Note 10.1, Note 2 10.1, Galaxy Tab 2, Galaxy Tab 10.1, Galaxy S3 and lots of other Android phones and tablets.
Method 1: Kies Air—Wireless Transfer music and video to Galaxy Note 10.1, Galaxy Tab 2 and Galaxy S3
Works for: Music, photos, recorded videos, other files—non-DRM protected content only
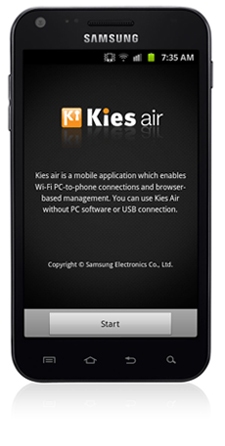
Overview: Kies Air makes it simple to transfer and manage multimedia content, text messages, bookmarks and more between your mobile device and a PC or Mac when they share the same wireless access point or router.
Why this way is great: Kies Air doesn’t require any additional software to be installed on your computer or mobile device while providing a powerful and intuitive tool for managing your content.
Requirements:
- Windows
- Internet Explorer 7 or higher
- Mozilla Firefox 3.5 or higher
- Google Chrome 9.0 or higher
MacOS
- Safari 4.0 or higher
- Mozilla Firefox
- Google Chrome
Step-by-step Instructions:
1. To connect to Kies Air from your Samsung device, touch Applications > Kies Air > Start.
2. If not already connected to a Wi-Fi? network, you will be asked to connect, or (if available) turn on your device’s Wi-Fi hotspot capability.
Note: Your Samsung device and computer (PC or Mac) must be on the same Wi-Fi network in order to connect.
3. Kies Air will display a URL. Enter that URL in your computer’s web browser.
4. On the Samsung device, touch Allow to grant access to the device.
5. Download or manage files from the web-based interface on your computer’s browser.
6. Touch Stop on the handset to end the syncing session.
Read More: How to connect and transfer video files from PC to Galaxy Tab with Kies
Method 2: Drag & Drop—USB Wired Transfer music and video to Galaxy Note 10.1, Galaxy Tab 2 and Galaxy S3
Works for: Music, photos, recorded videos, other files—non-DRM protected content only.
Overview: Just plug your device into your computer using a USB cable, adjust some settings and start dragging and dropping files and folders.
Why this way is great: This method is great when you’re used to working with files and folders or just have a few files that you want to move.
Requirements: USB Cable that shipped with your Samsung device or a USB Cable that fits both your computer and Samsung device.
Note: The method described below applies to newer Samsung smartphones like the Galaxy SII and Galaxy Note running Android 2.3 (Gingerbread). For device-specific instructions, visit samsung.com/support and click Mobile. Search for your specific device and instructions for USB connecting.
Step-by-step Instructions:
1. Attach your Samsung device to your computer (PC or Mac) using the USB cable. If this is the first time you’ve connected your device to your computer, it will install the necessary drivers on your computer.
2. On your Samsung device, touch Applications > Settings > Wireless and network > USB utilities.
3. Remove the USB cable from you Samsung device.
4. On your Samsung device touch “Connect storage to PC.” You will see a warning: “USB utilities / Connect USB cable to use mass storage.” Insert the USB cable into your Samsung device while the message is still on the screen. Do not touch “Cancel.”
5. The screen will change to “USB mass storage” with a picture of a green Android and a message that says “USB connected.” Touch “Connect USB storage” at the bottom.
6. Your Samsung device is now connected to your computer. The device’s internal storage will appear on your computer as an external drive. If you also have a microSD card installed, this will show up as a second external drive.
7. You can now drag and drop files directly from your computer or iTunes to your device. You can create folders on your device as necessary to organize your files. Your device will automatically index these files and make them available in your media player.
8. IMPORTANT NOTE FOR MAC USERS: Before you disconnect your device from your Mac, you must eject the disks on your Mac, just as you would eject any disk or flash drive. After the drives have been ejected, touch “Disconnect storage from PC” on your Samsung device.
9. When you’ve moved all of the files you need to, disconnect the USB cable.
Method 3: DoubleTwist—USB Wired Transfer music and video to Galaxy Note 2, Galaxy Tab 2 and Galaxy S3
Works for: Music, photos, recorded videos, playlists—non-DRM protected content only.
Overview: Manage and sync your iTunes music, photos and videos with this popular and lightweight software. It’s easy to use and completely free. Also supports wireless sync with the Air Sync client ($4.99 on Google Play).
Why this way is great: This method not only syncs your media, but also your playlists and track ratings.
Requirements: Visit doubletwist.com for additional details.
Step-by-step Instructions:
1. Download DoubleTwist from Google Play on your Samsung device.
2. On your computer (PC or Mac), use your browser to go to doubletwist.com, and use the link to download DoubleTwist. Follow the installation instructions.
3. Follow the instructions on the app on your device and the computer to set up synchronization between DoubleTwist on your computer and Samsung device.
4. NOTE: If DoubleTwist has trouble recognizing your Samsung device when it is attached to your computer’s USB port, follow the instructions below to connect your Samsung device as a storage drive. Once complete, try the synchronization process again.
a. Attach your Samsung device to your computer (PC or Mac) using the USB cable. If this is the first time you’ve connected your device to your computer it will install the necessary drivers on your computer.
b. On your Samsung device, touch Applications Settings > Wireless and network > USB utilities.
c. Remove the USB cable from your Samsung device.
d. On your Samsung device touch “Connect storage to PC.” You will see a warning: “USB utilities / Connect USB cable to use mass storage.” Insert the USB cable into your Samsung device while the message is still on the screen. Do not touch “Cancel.”
e. The screen will change to “USB mass storage” with a picture of a green Android and a message that says “USB connected.” Touch “Connect USB storage” at the bottom.
Method 4: Google Play Music—Wireless cloud service to transfer music and video to Galaxy Note 10.1, Galaxy Tab 2 and Galaxy S3
Overview: Google Play stores all your music purchases and up to 20,000 songs from your personal collection for free. Listen on the web and your mobile devices without the hassle of wires.
Why this way is great: This method stores all of your content in the cloud and makes it available to stream or download to almost any device. It also plays music already loaded on your device, and allows you to purchase new tracks.
Requirements: Visit play.google.com/music for more details.
Note: Streaming music is only available through the Google Play Music app and not the native device Music Player. For devices that do not have the Google Play Music app pre-installed, it may be downloaded from Google Play.
Step-by-step Instructions:
1. On your computer (PC or Mac), use your browser to go to play.google.com/music/.
2. In the upper-right corner of the Google Play Music page, click on the “UPLOAD MUSIC” link.
3. From the “UPLOAD MUSIC” tab that appears, click on the “Download Music Manager” link.
4. Follow the instructions to upload your music to Google’s Music cloud. This process will take some time and will vary depending on the number of songs you choose to upload. You only need to complete this initial upload once. This initial upload process could take a few days, continuously uploading, or even longer, depending on how much music you have and the speed of your Internet connection.
5. Once your music has been uploaded, open the Google Play Music app on your Samsung device. Touch Applications > Play Music.
6. NOTE: You must be logged into a Google account to use Google Play Music. The first time you open the app, you will be asked to select your Google account.
7. Google Play Music may take a few minutes to synchronize your playlist to your Samsung device. Once your music appears, you can start playing.
Tips & Tricks for Transferring music and video to Galaxy Note 10.1, Galaxy Tab 2 and Galaxy S3
1. Make sure the video and audio are supported by Samsung Galaxy device.
2. Get a Galaxy Video Converter for decoding uncompatible videos for Galaxy Tablets and Galaxy Phones.
Samsung Galaxy Related Video Guide:
How to transfer music and video files to Galaxy Note 3?
Convert MKV DTS to Galaxy Note 10.1
Download Videos, Blu-ray, DVD movies on Galaxy Note 10.1